Preliminary
Dynamic Host Configuration Protocol (DHCP) Server is a service on Mikrotik that makes it possible to distribute IP Address network configurations. Besides Ip Address, DHCP is also able to distribute Netmask information, Default Gateway, DNS Configuration and NTP Server.
Mikrotik can be used as a DHCP Server or DHCP Client or both simultaneously. For example, suppose we subscribe to the internet from ISP A. ISP A does not provide static IP information that must be installed on our devices, but will provide IP automatically through the DHCP process.
How do DHCP Servers work?
We often know how the DHCP Server works by the term DORA (Discover, Offer, Request, Act). For more details, consider the following picture.

Discover: Client looking for a server which provides DHCP Server services
Offer : The server replies to the client that it provides DHCP Server services
Request: Client requests a service from a server that provides DHCP Server services
Act : Server provides DHCP Server services to clients
Configuration
In order to better understand, we will configure from starting to give the IP address first.
1. Setting the ip address by clicking the Ip menu => Addresses

Then a display will appear as follows, click the (+) sign in the upper left corner to add an IP address.

After that a display will appear as follows (Address = the ip address address to be used, here as an example I use the ip address 192.168.20.1/24) for the Address it is mandatory to fill in the Subnet Mask otherwise the ip address will not be installed correctly, for Network, let's not fill it in because it will be filled in automatically later, (Interface = the interface to which the IP address will be assigned, here I use the ether4 interface) if so, don't forget to click OK.

2. Next we set the DNS so that the client can access the internet later. The way we click on the menu Ip => DNS.

Enter DNS on the Servers menu here I use Google DNS which is 8.8.8.8 for Dynamic Servers it will automatically fill in if our router accepts DHCP Client services from routers that are connected to the ISP, check Allow Remote Requests so that clients can use the DNS on the router, after done click OK.

3. After that, we set a firewall so that our private IP can connect to public IP (basically private IP can only connect to private IP and public IP can only connect to public IP). Therefore, we have to set the firewall by entering the menu IP => Firewall.

Click the NAT menu then click the (+) sign in the upper left corner to add settings.

On the General menu, fill in Chain: srcnat (srcnat = source), then fill in Out.Interface: interface that is connected to the internet, here my interface that is connected to the internet is ether1, so we enter the interface as ether1.

After filling in the General menu then move to the Action menu, in the Action option we select masquerade (masquerade = functions to disguise private IP so that they can be connected to each other with public IP and vice versa) after finishing click OK.

4. After that, so that our router can access the internet, we first set routes by going to Ip => Routes.

The display appears as follows, on the routes menu, click the (+) sign in the upper left corner to add the IP gateway router that is connected to the ISP.

On the General menu, we only add the Gateway section, namely the IP address of the router connected to our router that is already connected to the ISP, here the IP it uses is 192.168.100.1 (without the Subnet Mask), then click OK.

5. When finished, we will create a DHCP Server by going to the menu Ip => DHCP Server .

On the DHCP menu, click the DHCP Setup option.

In the DHCP Server Interface option, we select the interface that will be used as the DHCP Server service, here I enter ether4 which we have set in the previous IP address creation, then press Next.

The DHCP Address Space by default will be filled with the IP Network from ether4 that we created earlier, namely 192.168.20.0/24 (include the Subnet Mask), then press Next.

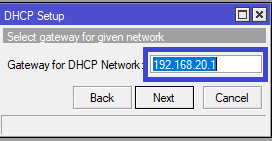
On the Gateway for DHCP Network, we enter the ip address from ether4, namely 192.168.20.1 (without the Subnet Mask), then Next.
After that, determine the ip range that will be given to the client who receives the DHCP Server service, by default it will be filled in accordance with the Subnet Mask of the ip address that we created earlier, because we made the ip address with a Subnet Mask /24, the ip range by default will be filled with 192,168 .20.2-192.168.20.254. we can change it as long as it is with a valid ip range, after that Next.

After that a Lease Time will appear, namely the refresh time of the DHCP Server service, we just save it by default, then Next.

If Setup has completed successfully appears, that's a sign that our configuration is complete, click OK.

Testing
After that, we will test whether the configuration we made is working properly or not, here I use Windows as the client, so we enter the Contol Panel menu => Network and Internet => Network Connections, then click 2x on the Ethernet interface, a display appears like In the following, we select Internet Protocol Version 4 then click OK.

Next, make sure we select Obtain an IP address automatically and Obtain DNS server address automatically to receive DHCP server services, if so, press Ok.

When finished, we enter CMD by pressing Windows+R, typing CMD or in our search, typing Command prompt then Enter, then we enter the ipconfig /release command, then press Enter to refresh the ip address as follows.

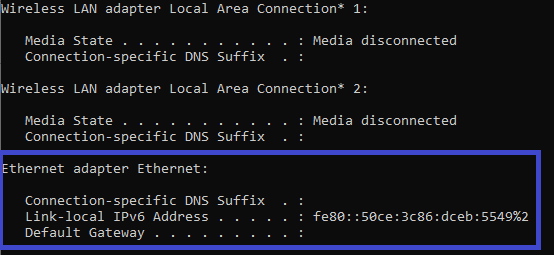
Then a display like the following will appear, here we can see that the Ethernet adapter still does not have an IP address.
To request DHCP Server service, we enter the ipconfig/renew command then press Enter as shown below.

Then a display like the following will appear, here we can see that the Ethernet adapter has received DHCP Server services, namely the Ip Address, Subnet Mask, and also the Default Gateway that we created earlier on the Mikrotik router.

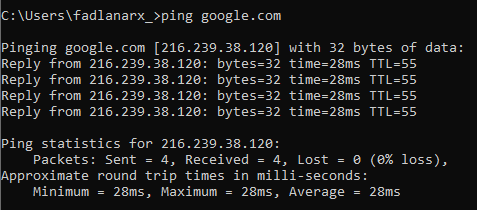
After that, we test the internet connection by entering the ping google.com command, if it appears as shown below, it's a sign that the client is connected to the internet.
That's all the DHCP Server configuration on the Mikrotik router that I can convey, I hope this is useful for readers, Thank you for visiting :)
Komentar
Posting Komentar